Visual Field Assessment Tool
The Current Design
Over 15 years ago a student and his father hand assembled a visual field assessment tool for use at the NECO Center for Eye Care at the Perkins School for the Blind. The device, informally known as the 'Kong Wand', is used to assess the visual field of non-verbal patients by tracking their eye movements in response to stimuli. It has been a critical tool for the clinic but often needed battery replacement and repairs due to its hand-assembled nature.
Version 2 Requirements
After years of repair the device stopped working and needed repair. I took this opportunity to redesign the device with the following requirements in mind:
- Made of black material to reduce need to repaint after scratches
- Adjustable rate of flashing
- Adjustable brightness
- Adjustable colors
- Rechargable battery
- Screen to show the settings and battery life
- Able to be reproduced for other clinics to use
PCB Design
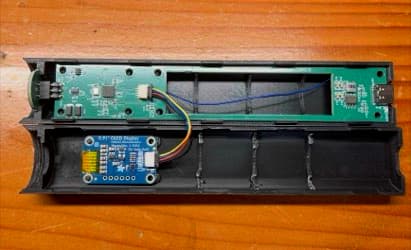
I used EasyEDA and JLCPCB to design and manufacture a custom PCB that integrated an ESP32 microcontroller, a battery management system, NeoPixel LEDs and a small OLED display. This PCB can be reordered fully assembled, allowing for easy reproduction and distribution to other clinics.
Firmware Design
3D Printed Enclosure Design
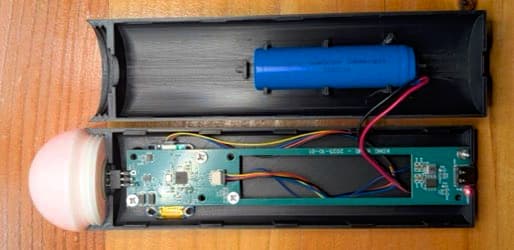
I designed the PCB and enclosure around a cutout for a standard 18650 rechargeable battery to make the device as slim as possible. I used that cutout to make the LED board that sits on top of the device sending light up into a white diffusion top. The PCB screwed in and the two halves of the enclosure snap together with the diffusion top threaded on top. This mostly worked but the screen needed to be on the opposite side of the buttons which would affect the assessment.
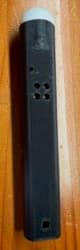
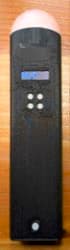
Enclosure Improvements
I redesigned the enclosure to be wider and allowing for several improvements:
- Screen on the same side as the buttons for easier use
- Thicker top diffuser to reduce hotspots from layer line issues
- Rotated the print direction to improve appearance on current surfaces
Next Steps
This device was sent for use in the clinic and received positive feedback but also some suggestions for improvement.
- Improve wake-up time for better responsiveness
- Adjust button layout for easier labeling and use
- Increase the length of the device for better ergonomics
- Move the target to the side (or put the target on a flexible arm)
- Adjustable targets to match the Goldmann Target Sizes